

Embarking on my journey as an entrepreneur, I fondly look back at a pivotal chapter as a Commis Chef with the Oberoi Group in Gurugram, India. This marked my debut in the world of pastry, being a newcomer not just to the industry but also to the realm of professional baking. While my tales from the Oberoi’s warrant a separate post, today, I’m eager to share an extraordinary opportunity that most bakers dream of – the chance to learn the art of crafting a chocolate structure, a true chocolate showpiece. This unexpected dream became a reality through a Masterclass by The Academy of Pastry and Culinary Arts (APCA) in Gurugram.
The APCA, a renowned pastry school both in India and beyond, regularly hosts masterclasses that attract baking enthusiasts and professionals alike. The Oberoi, in collaboration with APCA, would often nominate a kitchen team member for such valuable training sessions. Imagine my surprise when I found myself nominated for an exclusive 4-Day Masterclass on Chocolate Display, led by none other than Chef Stephane Treand. Honestly, I was blissfully ignorant of Chef Treand’s stature at the time, having only been familiar with the work of similar chocolatier, Amaury Guichon.
When the call for nominations echoed through our online groups, I impulsively seized the opportunity to enrol in the masterclass. Without fully understanding why, I eagerly threw my hat into the ring. Two reasons fuelled my enthusiasm: firstly, my placement at the Pastry Shop of the hotel, known as The Oberoi Patisserie and Delicatessen, where my daily tasks involved the art of chocolate making and baking an array of delights. Secondly, with my departure from the hotel looming at the year’s end to pursue further dreams, I craved as much learning as possible before bidding farewell.
Given the hotel’s proximity to APCA, Chef Stephane Treand found accommodation there during the masterclass. I sensed a bit of surprise from the higher-ups at my enthusiasm for the workshop, but with no other nominations in sight, I was chosen to represent our team. My executive chef, sensing my commitment, presented me with a task. He said, “Since you’re eager for his workshop, prepare a room amenity for Chef Stephane.“

The assignment from my executive chef turned out to be more than just a test of my amenity-making abilities. It became a gateway to understanding Chef Treand on a deeper level. While I regret not capturing a photograph of the Room Amenity I created, which featured an edible picture of Chef Treand and his MOF medal, along with some signature pralines from the hotel, it allowed me to connect with this culinary maestro. In the following, I delve into the invaluable lessons learned during the fascinating process of creating a chocolate showpiece.
Day 1: Introduction to the World of Chocolate Crafting

Our group consisted of eight eager learners, all ready to absorb the artistry of Chocolate Display from the master himself. The spotlight of the day was on a captivating creation: The African Gazelle. Whether Chef Treand officially named it or not, the title stuck with us. The masterclass commenced with Chef Treand sketching the envisioned Gazelle, unravelling the elements that would make up the structure:

Our learning journey kicked off with the basics of couverture chocolate—the main ingredient for our artistic endeavour. Dark and White Couverture chocolate took centre stage as we brushed up on the nuances of tempering, an essential skill in chocolate crafting. We navigated through tempering temperatures, ensuring dark chocolate reached 310C-320C, milk chocolate 290C-300C, and white or coloured chocolate 280C-290C.


The next exciting chapter involved creating moulds for our structure. From readymade round and egg shapes to the ingenious use of hard paper for custom shapes, we explored the art of mould-making.


Our first day unfolded in a flurry of creativity, focusing on the intricate details of mould-making for the structure’s different components. With chocolate needing time to set and crystallize, the foundations—roundels, candy tray, gazelle’s body halves, head, and base of the flower—were expertly laid on this inaugural day of our chocolate adventure.
Day 2: Bringing the Chocolate Structure to Life!
On our second day, the atmosphere was a tad more relaxed, but our focus heightened as we delved deeper into the intricate world of chocolate crafting. Our mission: to assemble the chocolate structure, making it stand tall and proud. To kick things off, we meticulously checked and polished the components crafted on the previous day.
The day’s goals were clear—connect the different pieces and elevate our creation vertically. Armed with cooling spray and tempered chocolate, we began the exciting task of piecing together our masterpiece. Our journey started by assembling smaller roundels, progressing to larger ones, the candy tray, and a small roundel serving as the foundation for the lower half of the gazelle. Once affixed, we let this structure set and crystallize for added stability.

Meanwhile, we crafted the slender sticks that pierced through the gazelle’s neck (as depicted in the photo). These sticks were ingeniously made by filling plastic straws with melted and tempered chocolate, a technique that Chef Treand generously shared. The straws closed with masking tape, found their temporary home on floral foam, a spongy phenolic foam typically used for real flower arranging.
With the foundation now solid and able to bear the gazelle’s weight, I began by securing the lower half. Cooling spray and tempered chocolate worked in tandem to seamlessly attach it to the small roundel. As we moved to create the base of the flower, I skillfully joined two halves of round balls with melted chocolate, adding an inverted half for visual appeal.
The moment of truth arrived when it was time to attach the upper half of the gazelle. Admittedly, my hands trembled a bit at this critical juncture. The lower half boasted sturdy legs, but the neck posed a unique challenge—a delicate inverted C shape with minimal support pillars. Doubts crept in, questioning the weight distribution and whether I had erred in crafting the neck.
I realized that crafting a chocolate structure was no walk in the park, it required meticulous measuring of different elements and parts. Finding balance, especially in weight distribution, became crucial. Chef Treand had demonstrated a locking mechanism at the ends of the gazelle’s body halves, meant to secure them together. Yet, I found myself struggling to make the halves lock due to a miscalculation in the distance between the locks. Understanding my predicament, Chef Treand suggested carving certain ends to ensure a proper fit.

Witnessing everyone’s unique struggles to match up to Chef Treand’s masterpiece, I reminded myself that it’s okay to be here to learn. If I already knew how to make the chocolate structure, I wouldn’t be in this masterclass. I reassured myself, “What’s the worst that could happen? The whole structure falls down? It’s alright; at least I tried.” Fortunately, that worst-case scenario didn’t come to pass!

The day concluded with the insertion of pipes through the gazelle’s neck. As our creation rested to crystallize and set, our final task was to craft the petals of the King Protea flower. To make the leaves, I dipped a straight knife without any indentions into dark-tempered chocolate. The knife was then placed vertically on an OHP sheet, gently picked up and swiped down to make the tail of the petal. Similarly, the entire row of petals was made. The OHP sheet was then placed in a curved tray so as to give shape to the petals. This was also left overnight to set.
Day 3: Crafting the Finishing Touches
Entering the masterclass with a heart full of hope, I was overjoyed to find my Gazelle proudly standing tall – a testament to the chocolate Gods smiling upon me! Grateful for the structure’s stability, we embarked on the goals for the third day, which included creating the horns, tail, and ears of the gazelle, assembling the flower petals, crafting leaves and ferns around the base, and applying a vibrant spray of colored cocoa butter to the flower and face.
To bring the horns, tail, and ferns to life, we employed the magic of modelling chocolate. This chocolate paste, resembling dough, was concocted in-house using Chef Treand’s trusty Robot Coupe cutting mixer machine. Working with precision, we rolled and shaped the modelling chocolate into elegant horns for the gazelle, ensuring they weren’t too long, too thick, or too curved to maintain the structure’s balance. The same technique was employed for the gazelle’s petite tail, as well as the sticks and ferns adorning its base. For intricate details, we used piping tips to create holes in the fern leaves, adding that extra touch of finesse to our chocolate masterpiece.

The next endeavour involved a new technique for crafting green leaves. Using layers of colours and chocolate, I discovered a fascinating process. On a sizable OHP sheet, thick black lines of cocoa butter were artfully drawn horizontally at intervals. Then, a coat of yellow cocoa butter filled the gaps, followed by a layer of light green cocoa butter. Onto this canvas, we added a layer of white-tempered chocolate, concluding with a final layer of dark-tempered chocolate (check the image above for reference). Each layer was applied once the previous one had semi-set. Once the entire sheet reached a semi-set state, we meticulously cut out ferns using a precision knife cutter, maintaining the connection to the OHP sheet. These cut ferns were then shaped to resemble the leaves surrounding a flower.

The next step involved airbrushing the King Protea Flower and the Gazelle’s face. However, the airbrushing station was situated a bit away from our working areas, presenting the challenge of transporting the delicate chocolate structure to the airbrushing station. In a collective effort, we all assisted one another in carefully lifting and moving the structures back and forth. The awareness of the effort invested by each of us in creating these chocolate masterpieces made us handle them with utmost care. While manoeuvring my structure, my only prayer echoed, ‘Please don’t fall down like a tower of Jenga, please don’t fall down like a tower of Jenga.‘

After bringing the chocolate structure back to my working table, I added a touch of glamour by dusting the flower with edible silver glitter, giving it a delightful shine. To complete the masterpiece, I crafted the eye of the gazelle by piping melted dark chocolate. With these final touches, we wrapped up our third day, eagerly anticipating the opportunity to conclude our chocolate journey in style on the last day.
Day 4: Revealing Our Chocolate Masterpiece
The much-anticipated final day of the masterclass had arrived, and we were brimming with excitement, proud of how far we had come, overcoming a few hurdles and soaking in valuable lessons along the way. Our agenda for the day was to add the finishing touches to our chocolate structures. Additionally, Chef Treand had a special master skill to unveil—a unique addition to his Chocolate Structure, the lady adorned with traditional African Headgear.
Before delving into this new skill, we focused on completing our individual chocolate structures. My remaining task was to attach the horns and ear to the head of the gazelle. However, as I began attaching the horns, one of them unfortunately snapped into two! My worst fear had come true. Chef Treand, quick to assess the situation, explained that the horn I had made was too long and couldn’t support the weight, leading to the breakage. Undeterred, I decided to promptly create a new set of horns for the gazelle. In the meantime, I successfully attached the ear to the gazelle’s head and, after a second attempt, triumphantly secured the horns in place.

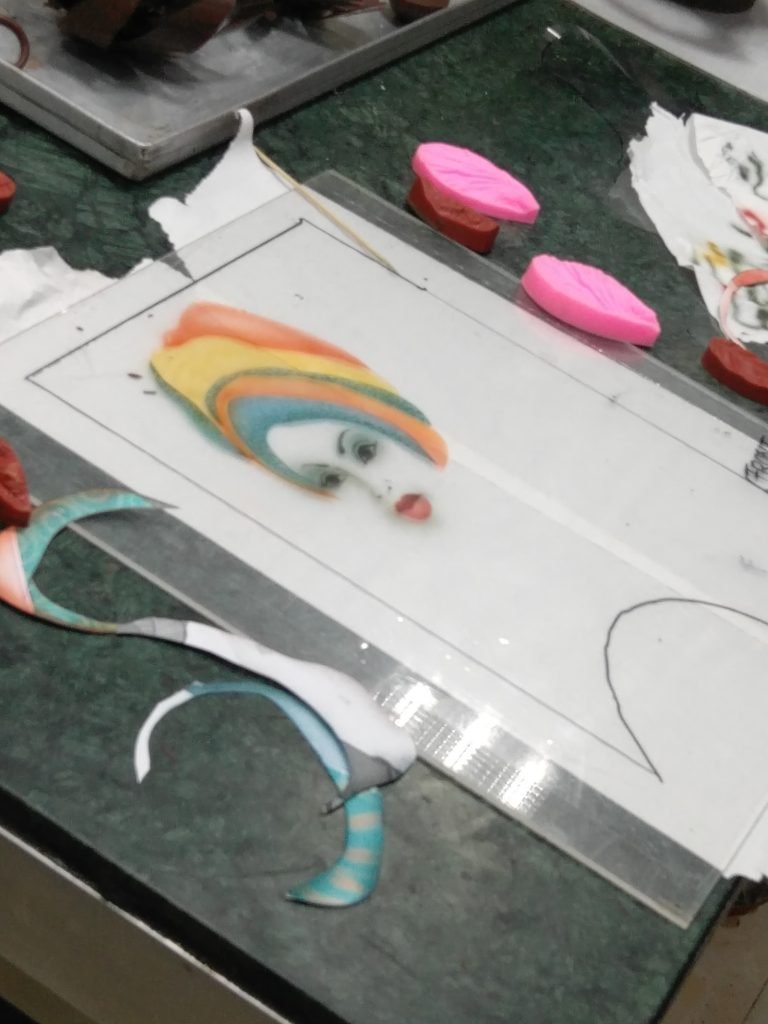
Meanwhile, Chef Treand proceeded to demonstrate the Air Brush Technique for creating the Lady with the Headgear. Using a stencil as his guide, he began by airbrushing the facial features before moving on to the intricacies of the headgear. The precision and skill required to spray different colours and create patterns left us all in awe. Chef Treand seamlessly wielded the airbrush, conjuring magic before our eyes. Following the painting, he poured white-tempered chocolate to provide a backing to the entire bust, followed by a layer of dark-tempered chocolate—a method reminiscent of how we crafted the leaves around the Protea flower. The masterpiece reached its culmination when he successfully attached the African lady to his chocolate structure, marking the completion of the masterclass.


Expressing our gratitude, we thanked Chef Treand for imparting the invaluable techniques of crafting chocolate structures. We joyfully captured moments with our creations, proudly displaying our achievements, and were presented with certificates signifying the completion of the masterclass. As the time to bid farewell approached, an unexpected ritual unfolded—fellow students, who had meticulously crafted their chocolate structures over the four days, climbed onto tables and threw their masterpieces onto the floor. A surprising spectacle that left me shocked, as I wasn’t prepared to part with my Gazelle so easily and chose not to participate in the unconventional tradition.

The following morning brought another challenge – transporting my chocolate structure back to the hotel. April in Delhi meant high humidity, not ideal conditions for delicate chocolate creations unless in a temperature-controlled environment. Despite cranking up the air conditioning in the car and driving cautiously, my African Gazelle made it back to the hotel in parts. However, the structure persevered, with only bits of horns, a few petals, and grass showing signs of breakage.
Reflecting on those four days, I can confidently say they were some of the most challenging yet enlightening days of my life. A special thanks to Chef Treand, APCA, and my team at The Oberoi’s for granting me this once-in-a-lifetime opportunity.